Restrict Content Access - Make Content Private
ADVANCED FEATURES & INTEGRATIONS
Private Publications
Monetized Access (Recurly)
Google Tag Manager Integration
Shopify Integration
Mailchimp Integration
Embedding a Hubspot form
< BACK TO OVERVIEW
You can restrict access and add authentication requirements to your publications to make some content private.
Readz offers you a number of ways to restrict access to private publications. These include:
- email based access
- list of email addresses
- your email domain
- passcode based access
- SAML / single sign-on
In this guide, we will explain the properties of these different access limitations, and we will show you how to set up and configure these options for your publications.
Overview
- Public publications
- Note: Search Engine Indexing
- Access restriction based on email addresses
- Access restriction based on your email domain
- Access restriction based on a passcode
- Customizing the reader login screen
- Access restriction with SAML
- End user experience with SAML / single sign-on
Public Publications
Public publications are accessible for everybody all the time after publishing. Anybody who has the link can see the contents of the pages in the publications. This content can be shared on social media, and also, search engines are able to crawl and index these pages so they can be found by searching on the web.
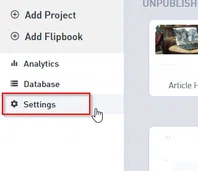
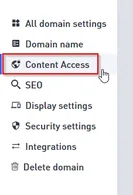
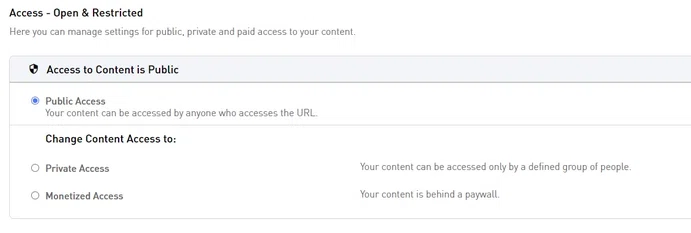
By default, the access restriction of your publications is set to 'public'. You can find this setting on the 'Settings' section of your domain, by selecting 'Content Access'.


When 'Public Access' is selected, then your publication is accessible for everybody.

Note: Search Engine Indexing
In Public Access mode, you can control whether your page is indexable by search engines or not. For all publications, search engine indexing is off by default. After you set up your custom domain, you can turn search engine indexing on. For private publications, search engine indexing cannot be turned on.
If you prefer your publication not to be indexed by search engines, you can turn search engine indexing off.
If you turn off search engine indexing, your publication will only be accessible to people who have the exact URL of your publication. By selecting this option and using a non-obvious URL, you can create a light form of access control. Of course, even though your URL will not be found by searching on the internet, it can still be shared.
You can turn off search engine indexing for all publications under one domain or for specific pages. To turn off search engine indexing for the whole domain, go to 'Settings' and open the SEO tab.
To turn off search engine indexing for a specific page, open the editor view of that page. You can find the 'SEO settings' on the top menu bar in your editor.
Clicking the SEO settings option will open up the 'Page SEO Details', where you select whether you want this page to be indexed by search engines or not.
Private Publications With Access Restriction Based On Email Addresses
You can restrict access to your publications to the owners of specific email addresses. By selecting this option, Readz will verify that the person who tries to access your publication is indeed the owner of an 'allowed' email address by double verification.
In the verification process, Readz will send a verification email to the specified email address. Once the end user has verified their email address, they are granted access. This is a one-time setup which afterwards grants automatic access to the end user, and avoids that your readers have to log in with email and password over and over again.
Note that the verification process will happen on any new browser or device used by the end user for additional security.
You can select to use this level of privacy by going to 'Settings', selecting 'Content Access' and then selecting 'Private Access'.
Select 'Restricted access based on email addresses', and choose the option of 'Specific Emails' or 'Everybody with an email from a specific domain'.
If you select the first option, the Manage Subscribers panel will open.
In the 'manage subscribers' panel, you will be able to see and manage all the email addresses which have access to your publication.
You can new email addresses manually or by CSV upload.
For each email address you have the following options:
- 'active' status. You can turn off access for a specific email address without deleting the address with this option
- 'end date'. If you want access to your content to end on a specific date, you can enter a date when you add the email address
The 'Manage Subscribers' panel will also give you information on:
- 'Last Request': when this email address last tried to access your content
- 'Request Count': how many times an email address has tried to access your content
- 'Last Access': when this email address last accessed your content
- 'Access Count': how many times an email address accessed your content
If you select the 'Everybody with an email from a specific domain' option, the Edit Email Domains Whitelist panel will open.
You can add all the domain names you'd like to give access to by clicking on the plus sign.
If there are specific email addresses belonging to an 'approved' domain for whom you'd like to manage or remove access, you can do so by adding and managing these specific email addresses in the 'Manage Subscribers' dashboard. The settings entered here for specific email addresses will override the general domain approval.
Private Publications With Access Restriction Based On A Passcode
This is a simple but less secure form of protection for your sites. You can set up a single passcode for your domain. When opening any of your pages, the reader will be asked to enter this passcode before gaining access to the content.
In your domain settings, Content Access section, choose Private Access > Restricted access based on passcode. Set a passcode. Turn restricted access on.
Customizing the reader login screen
When a visitor tries to access your restricted content for the first time, they will see a notification asking them to enter their email address or their passcode, depending on which of the options above you chose.
Login screen customization
You can customize this login screen from the Content Access panel. You can change the logo, the text under the 'Submit' button and you can also add a link to a page with other info or help.
If the visitor enters a valid passcode, they will immediately have access to the content.
If the visitor enters a valid email address, they will receive a secure link which will give them access to the restricted content.
These authentication links are unique, secure and valid for 1 single use. Once the user clicks the link, a cookie is placed on the user's computer for future visits. No password is needed.
Email customization
You can (and should) customize this email and the sender. Your readers will expect to receive an email from your domain, and the amount of emails that can be sent from Readz is limited.
If you want to change only the sender, you can set up the emails to be sent from your email server.
If you want to change the sender AND the format or content of the email, you can connect to Mandrill, which is a transactional email platform from Mailchimp. The platform is not free, but starts at 20 USD for 500k emails. More details, please see here: https://mandrill.com/pricing/
Mandrill will allow you to use email templates made with Mailchimp's visual email editor.
More information on the use of Mandrill can be found here.
Re-authentication
Normally, a user does not have to re-authenticate for subsequent visits to the publication.The demand for re-authentication occurs only when the authentication cookie expires or is not present (when the user is on a different device or different browser). If the user clears their cookies, they will also need to re-authenticate.
Some browsers however have a unique way of handling cookies. For example, if your users are on Internet Explorer and have the maximum security settings enabled, they will have to explicitly allow to accept the authentication cookie for your content. If they do not accept the authentication cookie, they will have to re-authenticate with each session.
In the large majority of cases, however, there is only the need to authenticate one single time.
Private Publications with single sign-on: SAML
Clients who are on an enterprise plan with Readz can use SAML for authentication.
Security Assertion Markup Language (SAML) is an open standard for exchanging authentication data between different systems. It is an industry standard and uses cryptography and digital signatures to pass a secure sign-in token from your network to Readz.
In practice, it means that all users who have access to your internal network will have access to the content you published on Readz without additional authentication.
If you want to set up SAML, please get in touch with your client manager to set up the configuration.
End User Experience With SAML
After SAML has been set up, your publications will behave exactly like your other internal applications and content. All visitors who are logged in to your internal network will be able to access and read your publications directly. If they are not logged in to the network, they will have to do so to get access to the publication.
Contact Support
STAY IN THE LOOP
Sign up for product updates
