Navigation dots
Functionality
In a long page, navigation dots help the reader visualize the amount of content available, and provide a simple way to scroll to a different section.
- Each dot corresponds to a section, and is highlighted in a different style when its section is displayed.
- Clicking on a dot will scroll to its corresponding section.
- Optionally, a label with the section name can be displayed when hovering over each dot.
Navigation dots can also be bound to a carousel or slideshow to indicate how many slides are available for viewing
- A different style in the dot will show the current slide's position in the sequence.
- Clicking on a dot will navigate to the corresponding slide.
Adding vertical dots for page navigation
On the element Index on the right, select the top container, "Page".
Open the Add Elements panel on the left. In the Jedi tools category, select the Dots element and double click to add it to the canvas.
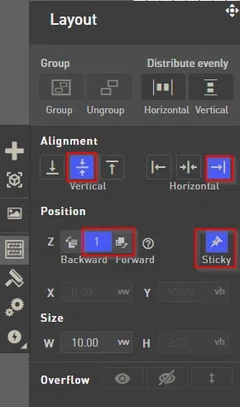
Select the Dots element, open the Layout panel and make it Sticky so that it is always visible, even as the viewer scrolls down. Bring it forward to a Z level of 1 or more so that it is in front of all the sections on the page. Optionally, center align it vertically and right align it horizontally.
Go to mobile view and repeat the Layout settings.
Now open the Element Properties panel and click to Add Dot. You will be prompted to select a target element from the canvas. Click on your first section to create the first dot.
Repeat the Add Dot process to create the other dots, each time selecting a different section from the canvas.
When all the dots have been created, resize the Dots element to resize the dots.
By default, the section name will be revealed in a label when hovering over each dot. You can rename a label by clicking on the pencil icon and editing the text on the Dots Properties panel. To remove the label, click on the pencil icon, delete the name and hit enter.
Adding horizontal dots for slideshow or carousel navigation
Open the Add Elements panel. In the Jedi tools category, select the Dots element. Drag and drop it under your carousel or slideshow.
Open the Element Properties panel. In the Bind to Slideshow/Carousel section, select you slideshow or carousel from the dropdown menu. This will create one dot for each slide. If you change the number of slides in the slideshow or carousel, the Dots element will be automatically modified to reflect this.
Styling the dots
To style the dots, select a single dot and open the Sub-Element Style panel. The changes you make will apply to the "dot" style template, which is the style given by default to all the dots in your project.
Change the background color for "None" state (this is how the dot will look when its corresponding section is not on display) and for "Active" state (this is how the dot will look when its section is on display). You can also set a different style for when you hover over a dot.
Contact Support
STAY IN THE LOOP
Sign up for product updates